Why ? Earlier, my students created a small FM radio. However because of the lack of IC’s and the associated PCB’s and one was talking about replacing FM by DAB+, the search for a new project was started. Finally I found a manufacturer in Taiwan who was willing to sell to me the DAB+ tuners. Because, for the use of only the students, the project would last to many years with the purchased amount, this product is also offered to the electronics hobbyists. The interest is larger than expected, so an extra batch of tuners was purchased. In this project there are different separate available parts: The tuner.

TA4 tuner
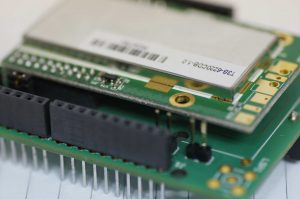
The tuner is the T4A from Keystone Semiconductor. It is an ETSI EN 300 401 compatible tuner. It can receive DAB+/DAB and FM. The T4A tuner is pin2pin compatible with the T3B tuner, but it has a different commandset. Note : The T4A tuner is NOT compatible with the T4B tuner. This is an slave module; you need to send commando’s to the tuner. This can be done using an Arduino or other µcontroller (or pc). The communication is via UART or I2C. This module does contain the option Dataserive or SLS-function (slideshow). But one need a more powerfull µcontroller than the UNO. At this moment there is a working demo witch uses a Teensy4.0 µcontroller board as you can see in the next link; https://youtu.be/J-cZKDPtvTM. There are I2S and SPDIF possibilities, to be activated by a command. On the new interface pcb there are connection provide for these functions. Audio is provided via LINE-OUT. Tuner uses 3,3V and 1,2V. the interface pcb. UNO

Interface for UNO
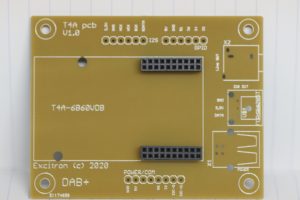
There is a pcb developed on which the components are fitted for providing the correct voltages to the tuner, and this at the right moment (one voltage must be provided before the other). There is also a shiftleveler for converting the 5V from the Arduino (or other) to the 3 .3V of the T4A tuner. The interface is already soldered and provided with all the necessary connectors and headers. The interface pcb can be plugged on the Arduino UNO. So, another pcb can be put on witch one find the lcd or buttons to control the software.
interface + TA4 tuner for UNO
Other µcontrollers
T4A basis interface
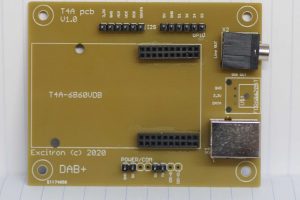
As for the slide show, a much more powerful processor is required than the UNO and normally this μcontrollers always uses 3.3V, so there is created a new interface. This has been soldered with all components required to run and to make connection with the tuner using the μcontroller of your choice. The basic (see above) version includes the connectors for the tuner but not the line-out connector, USB B- and TOSLINK connector. The enhanced version of the interface (see below) includes the headers for I2S, 4 GPIO pins, RX / TX and 5V / GND
Extended Basis Interface
There is also the line-out connector provided as the USB typ B connector for power. The TOSLINK connector is not provided. All pcb’s are soldered with lead-free solder. Pcb’s are manufactured by Eurocircuits.
The parts. The components, needed for the interface, are currently still available separately. If you would like to solder the pcb yourself, please send an email.
Next parts are NOT provided: next parts, needed for the project, are not provided when you buy the project.
lcd : one can choose there own lcd and change the code depending on the size of the lcd.
buttons: in the base-version of the project, there are 5 buttons used to control the tuner. These buttons are not provided.
Antenna: the antenna can be a simple wire. People who live close to a transmitter should not put to many demands on their antenna. When the transmitter is further away, the choice of antenna is becoming increasingly important.
RF-connector: One can solder the antenna wire directly to the tuner. If you want to use a better antenna, there are opportunities to solder a F-plug or SMA connector directly to the tuner.
Documentation. When you purchase the project, or tuner, there is extensive documentation. You will then receive the data sheet, the commands, how to build the interface, etc. These documents are not put online since they are documents with legally protected content. These original documents are edited and for these permission is obtained to share them with other electronics hobbyists under strict condition that those documents are not to be found online.
The price. You can probably find out that a number of components are cheaper in China (so that is why there is no matching LCD offered). Unfortunately, when larger quantities are purchased, as the tuner (or PCBs), the purchase passes via the authorities and various expenses are to be paid. Also the transport cost is a big cost.
Hobbyists You should still start working on this project yourself. So you receive ‘the basics’ of the hardware and some examples of software. You can still go either way. However, if you want a complete finished radio, it is best to buy such a radio in a store.
Excitron cannot sell you a completely finished radio. I then have to become a member of a certain organization, which costs me thousands of Euros. Rights must therefore be paid per radio due to the use of DAB + compression techniques.
Dozens of people have already preceded you and several have made a nice project of yistsit, such as Jan (ON7XQ) who converted an old radio into DAB + radio to this way to keep the beautiful cabinet.  DAB+ radio

Detail display
Or, look at ‘mine’ radio: https://youtu.be/wXAun-zF6Ro
Problems developing your project. Using the SLACK platform, a kind of discussion forum has been set up. Here you can go with your problems, comments, photos of your realization … This communicates a bit easier than via email and is free and not commercial. You can become a ‘member’ here by simply accepting an invitation. Others do not see your data. So if you have any questions during the development of your project, you are certainly not alone.

